Vulnerabilities
Vulnerabilities refer to the flaws or weaknesses of your environment and applications that can be exploited. Security Program 360 (SP360) detects these flaws, prioritizes them, and then suggests remedies for these weaknesses.
The Vulnerabilities page provides an organized and unified view of all vulnerabilities across your environment.
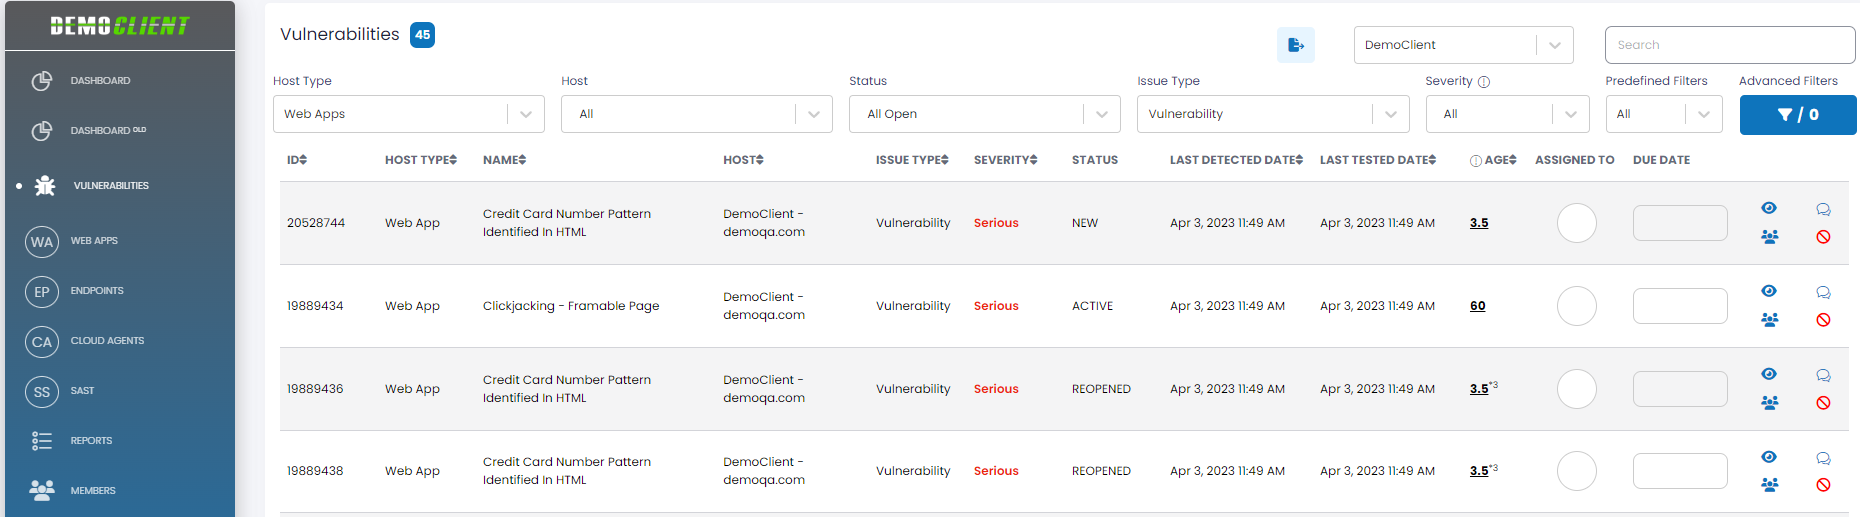
The upper left corner of the Vulnerabilities page contains a blue box with the number of vulnerabilities meeting your selection criteria.
The upper right corner of the Vulnerabilities page contains the Tenant Selection field and the Search box.

If there is only one tenant accessible by the user, the tenant’s name is displayed. If multiple tenants are accessible, the drop down allows you to select the specific tenant whose vulnerabilities you want to explore. Additionally, the Search box allows you to further filter the vulnerabilities currently being displayed based on: Finding ID (ID), Web App Name or URL, Qualys ID (QID), Endpoint or Web App IP Address, Endpoint Alias, Host Name or ID, Source Type, Vulnerability Title, ID and Status, Repository Name, CWE, CVE List, Watcher, and Assignee.
Filter Bar
A filter bar at the top of the page allows you to select vulnerabilities based on several attributes, including Host Type, Host Name, Status, Issue Type, Severity. Predefined Filters and Advanced Filters also make up the Filter Bar and are explained below.

| Filter Type | Definition |
|---|---|
| Host Type | This attribute characterizes the vulnerability based on the asset it applies to Web Apps, SAST, Endpoints, and Cloud Agents. The Host Type filter allows you to select all vulnerabilities, or those limited to a specific host type. Note: Endpoints are further partitioned to External, Internal or AWS, and Cloud Agents to Servers and Workstations. 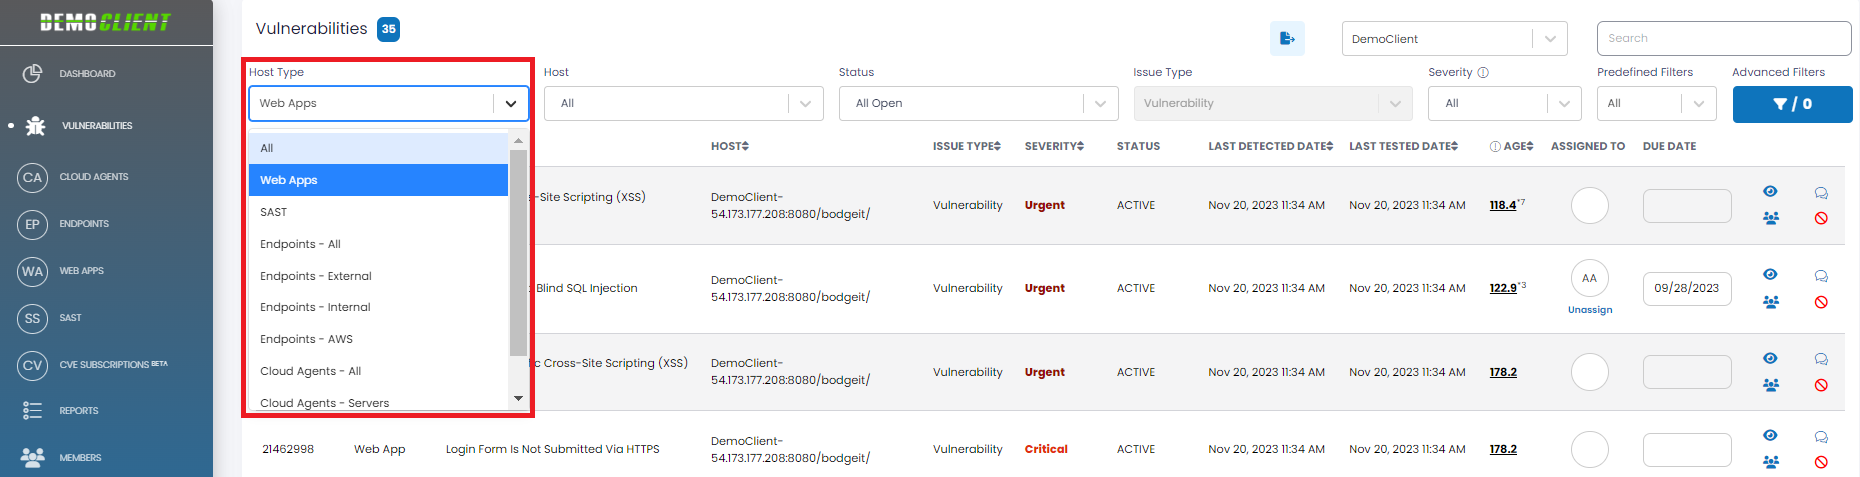 |
| Host | The full name of the host on which you can filter to view vulnerabilities. A Host filter allows you to display the vulnerabilities for the host selected in the filter drop-down. The Host filter has a multi-select capability, where you can select multiple hosts and can see the count of selected hosts in the filter. |
| Status | The status of the vulnerabilities. The available options in the drop-down are _ All: All of the existing vulnerabilities, regardless of state. _ All Open: Includes the New, Active and Reopened statuses. _ New (Last Scan): Vulnerabilities newly discovered during the last Qualys scan. _ Reopened (Last Scan): Vulnerabilities determined to be recurrences during the last Qualys scan. _ Active: All the active vulnerabilities (i.e., Open, but not New or Reopened). _ All Closed: Includes the Fixed and Ignored statuses. _ Fixed: All the fixed vulnerabilities. _ Ignored: All the ignored vulnerabilities. The Status filter has a multi-select capability, where you can select multiple statuses and can see the count of selected status types in the filter. For Status, the pulldown includes “short hands” for clarity and ease of use (e.g., “All Open” to include the New, Active, and Reopened statuses). 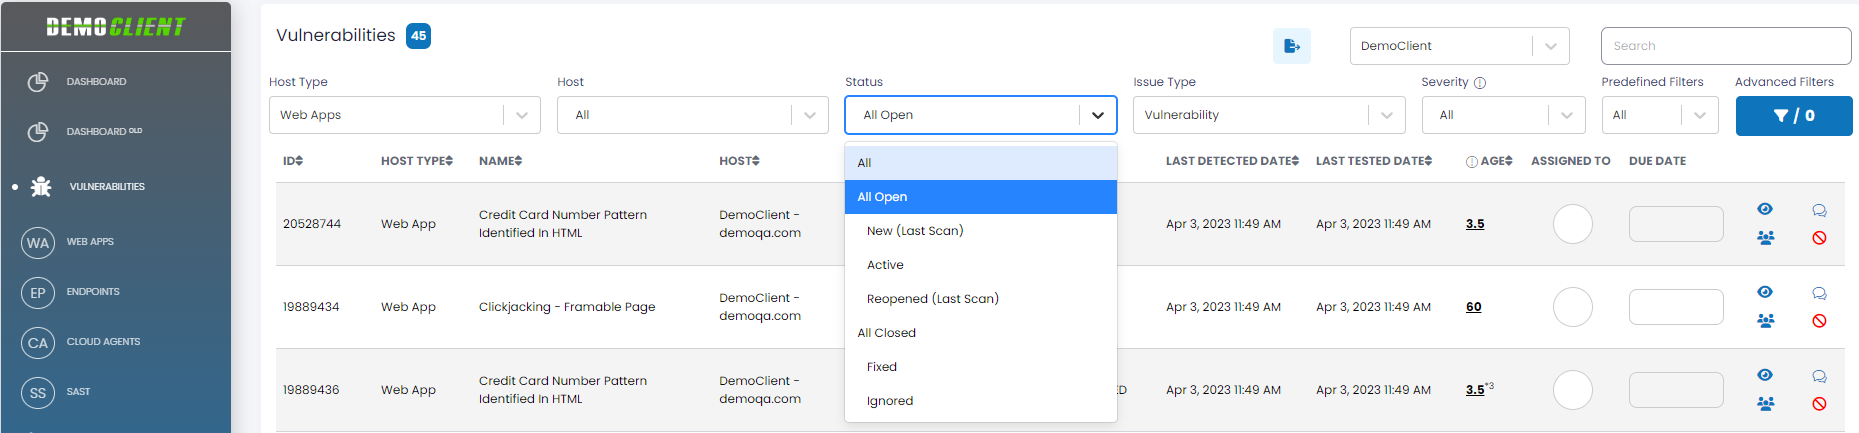 |
| Issue Type | The type (or class) of the issue, such as Vulnerability, Sensitive Content, Bug, or Best Practice Violation. The Issue Type filter allows you to display all vulnerabilities of the designated Issue Type selected in the filter drop-down. |
| Severity | The severity of the vulnerability reflects its impact. Available severities are:
|

Predefined Filters
This filter allows you to display the vulnerabilities that match the predefined value, for ease of use. Selections include, Patchable, Non-Patchable, High Severity, Obsolete, Assigned, Watching and Zero Day. These Predefined Filters cannot be changed.
Advanced Filters
The blue Advanced Filters button on the far right of the filter bar allows you to display vulnerabilities based on different date and time ranges. The Advanced Filter box also displays the number of advanced filters currently active. Below are the steps to filter using the Advanced Filters:
Step 1: Click the Advanced Filters button at the top right.
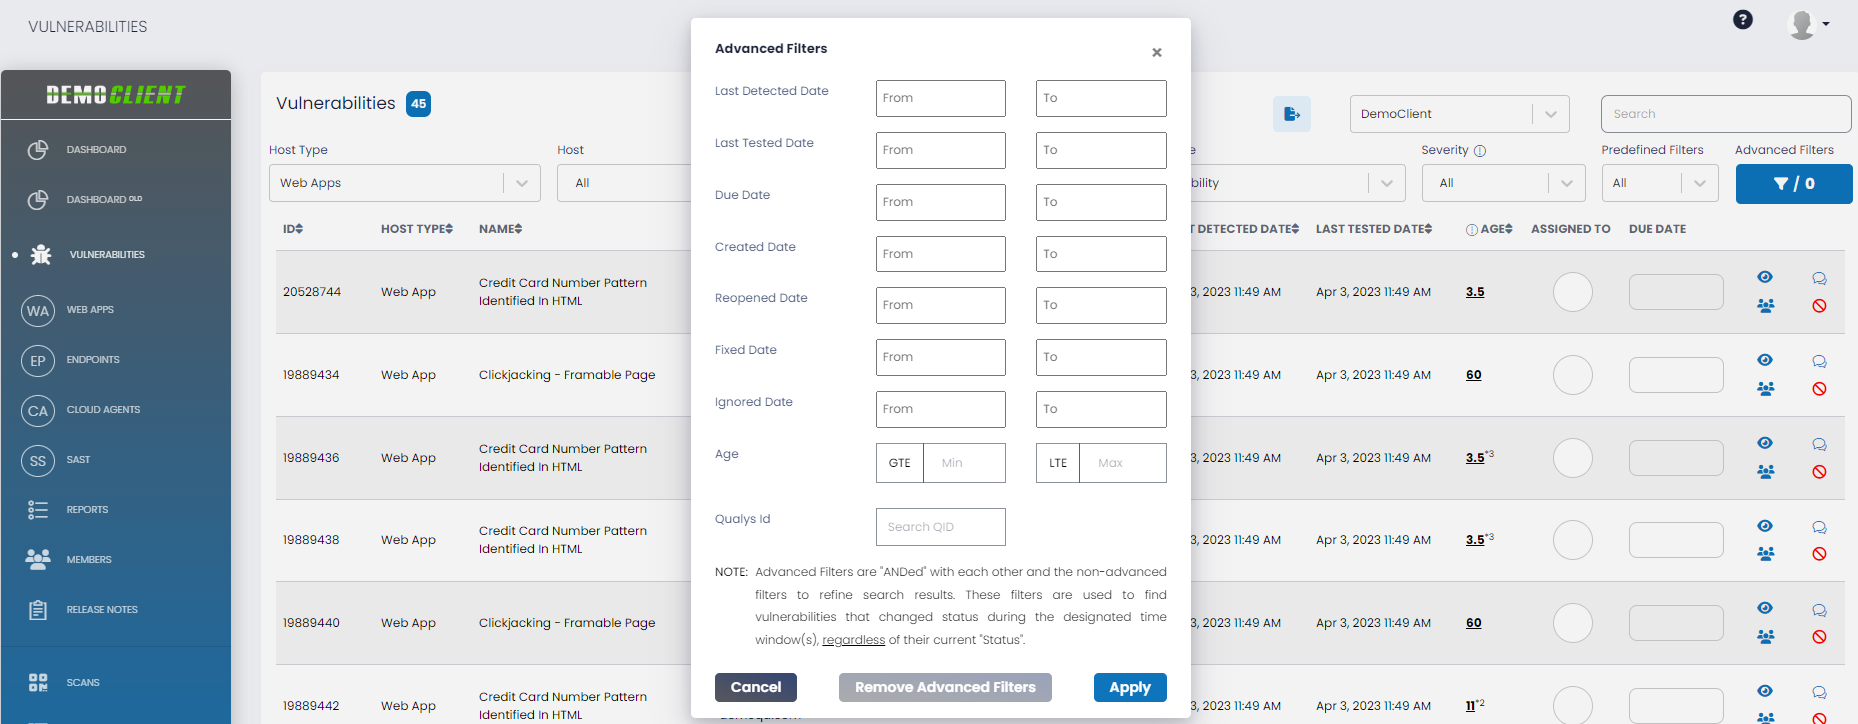
Step 2: In the Advanced Filters pop-up, you can filter the vulnerabilities based on different attributes that are defined below:

| Attributes | Definition |
|---|---|
| Last Detected Date | You can specify a last detected date range (From Date - To Date), which is the date of the last time the vulnerability was captured by a scan. If you don't enter a From Date, by default, vulnerabilities detected from the date the host was added. If you don’t enter a To Date, it defaults to the current date. |
| Last Tested Date | You can specify a last tested date range (From Date - To Date), which is the date of the last scan, regardless of whether the vulnerability was captured. If either the From or To Dates are omitted, they behave as described above. |
| Due Date | You can specify a due date range (From Date - To Date), which is the assigned Due Date. |
| Created Date | You can specify a created date range (From Date - To Date), which is the first scan in which the vulnerability was captured. |
| Reopened Date | You can specify a reopened date range (From Date - To Date), which is the date of the scan in which a previously closed vulnerability is rediscovered. |
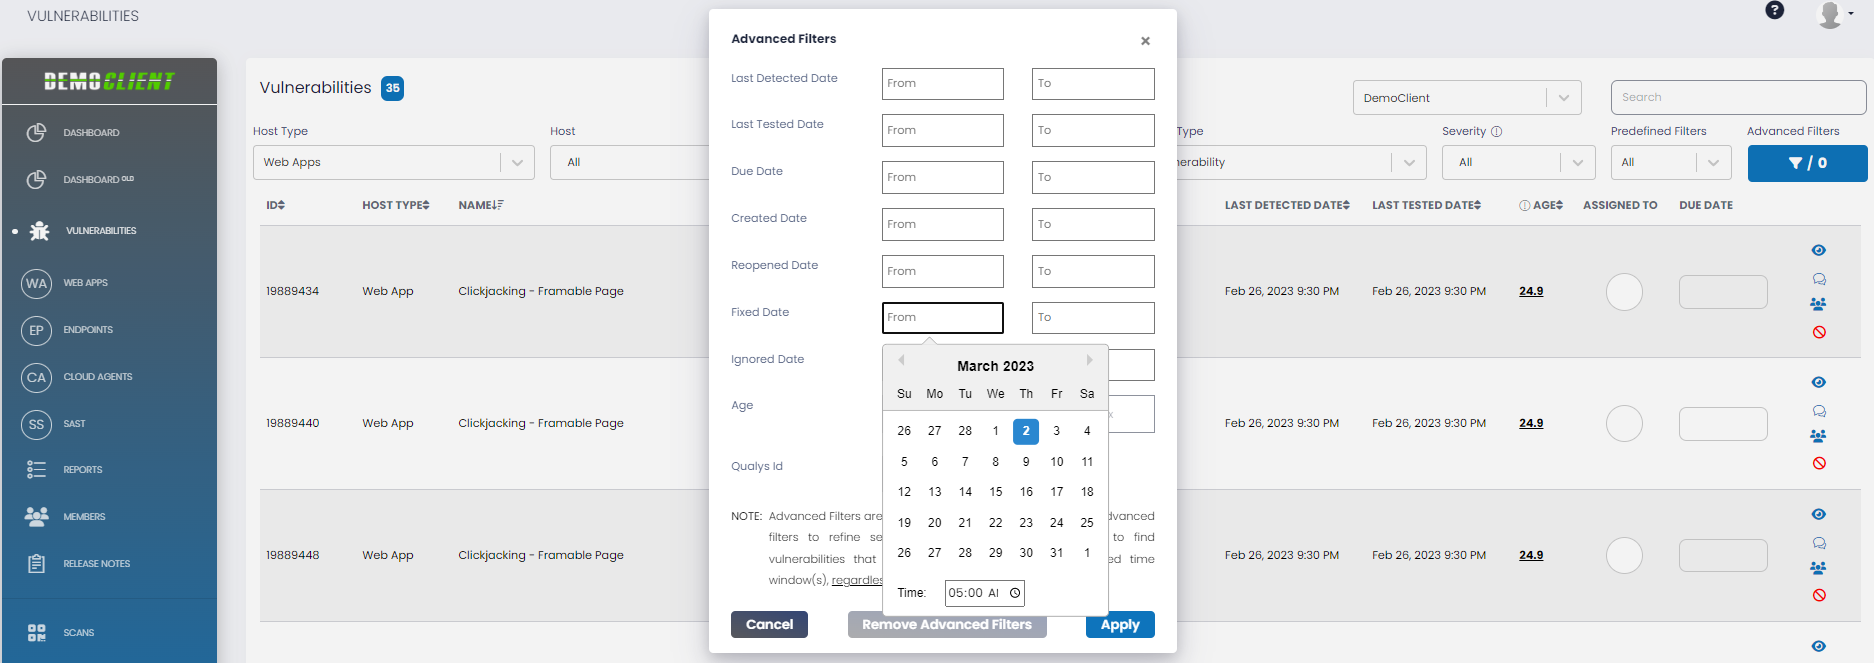
| Fixed Date | You can specify a vulnerability fixed date range (From Date – To Date), which is the date in which a scan determined a previously opened vulnerability is remediated. |
| Ignored Date | You can specify an ignored date range (From Date - To Date), which is the date the vulnerability was ignored (manually, automatically, singularly or in bulk). |
| Age | Each vulnerability has an age (i.e., how long it has been open), and this filter allows the specification of an age range. There are two parts to the From Age (i.e., GT or GTE) and the age in days, and two parts to the To Age (i.e., LT or LTE) and the age in days. |
| Qualys Id | You can specify a Qualys Id to filter a vulnerability. |
For each date attribute, a column is shown where you can specify a time range so that only vulnerabilities detected during the specified time on the specified days are displayed. Each date can optionally include a time (i.e., hour) within the date.
Step 3: Click the Apply button to filter. Once the filters are applied you will see this reflected in the filter count on the Filters button itself (i.e., /0 when no advanced filter is applied, and /1 through /N depending on the number of filters applied).
- Advanced Filters are "ANDed" with each other and the non-advanced filters to refine search results. These filters are used to find vulnerabilities that changed status during the designated time window(s), regardless of their current "Status".
- In the Advanced Filter pop-up, if the end user specifies a date and time, these are assumed to be in the end user’s local time zone.
Step 4: To remove all the applied filters, click Remove Advanced Filters in the pop-up window.
Vulnerabilities: Attributes
For each vulnerability displayed, there are attributes and actions possible. These are explained below:
| Attributes | Definition |
|---|---|
| ID | The unique ID assigned to each vulnerability. |
| Host Type | This attribute characterizes the vulnerability based on the asset it applies to: Web Apps, SAST, Endpoints, and Cloud Agents. The Host Type filter allows you to select all vulnerabilities, or those limited to a specific host type. |
| Name | A brief description of the vulnerability discovered for this asset. Clicking on the Show Details icon to the right allows you to drill down into the vulnerability and find out everything about the vulnerability, including its impact and potential remediation. |
| Host | The full name of the asset that has the cited vulnerability. A Host Name filter allows you to display the vulnerabilities for the asset selected in the filter drop-down. If an alias has been defined (currently for only Endpoints) the alias will also be displayed. |
| Issue Type | The type (or class) of the issue, such as Vulnerability, Sensitive Content, Bug or Best Practice Violation. The Issue Type filter allows you to display all vulnerabilities of the designated Issue Type selected in the filter drop-down.Note: Bugs and Best Practice Violations only pertain to SAST issues. |
| Severity | The severity of the vulnerability reflecting its impact. The Severity filter allows you to display vulnerabilities that match the severity selected in the filter drop-down. Available severities are: Urgent, Critical, Serious, Medium, or Minimal. |
| Status | The status of each vulnerability i.e. New, Active, Fixed, Reopened, or Ignored. Note: For ignored vulnerabilities, users can also learn about it's current state if it had not been ignored. The information is shown as follows: |
| Last Detected Date | The date and time of the scan in which the vulnerability was last detected. |
| Last Tested Date | The date and time a scan was last run. If the Last Tested Date is more recent than the Last Detected Date, then either the vulnerability was remediated, or the asset cannot be accessed. |
| Age | Time a vulnerability exists in fractional days. Open – Number of days since the vulnerability was detected. Closed – Number of days since vulnerability was closed or marked ignored. Fixed – Number of days from when the vulnerability was reopened. Note: If a vulnerability has been reopened one or more times, there will be a superscript next to the field indicating how many time that has occurred, as shown below. Each Age field is clickable, and doing so displays a pop-up that shows the vulnerability life cycle. Each Age field is clickable, and doing so displays a pop-up that shows the vulnerability life cycle.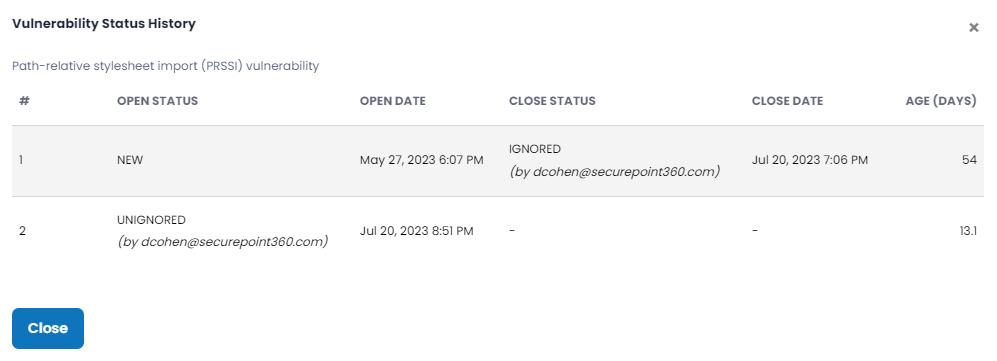 |
| Assigned To | This is an actionable field you can use to assign the vulnerability to a team member to address. See below. |
| Due Date | This is an actionable field you can use to specify, the date by which the vulnerability should be resolved. See below. |
Vulnerabilities: Actionable Fields and Icons
Each Vulnerability has two actionable fields and four available icons on the right side of each line.
| Actionable Field | Definition |
|---|---|
| Assigned To | Vulnerabilities that need to be addressed may be assigned to team members for resolution. By clicking on this field, you can assign the vulnerability to a team member. If the vulnerability has been assigned, this field shows the initials of the team member. For more information, click here. |
| Due Date | You can assign a target resolution due date for a vulnerability using this field. If assigned, and a due date specified, this field shows the date by which the vulnerability should be resolved. For more information, click here. |
| Icons | Definition |
|---|---|
| Clicking on this icon shows the additional details related to the vulnerability, in a pop-up window. Information such as the location of the vulnerability and a potential remediation. This Details page is the most critical information for understanding and resolving vulnerabilities. For more information, click here Note: For vulnerability details pertaining to Endpoints, additional information has been added to enable users to more readily diagnose and address Endpoint vulnerabilities. The additional information includes: (a) the Port and Protocol, and (b) a Vendor Reference (i.e. a link for additional details). |
|
| Clicking on this icon results in a pop-up window in which you can add descriptive notes for the status of a vulnerability. For more information, click here. | |
| Clicking on this icon allows you to select and add multiple users (one-by-one) as watchers for a given vulnerability. You can add a watcher by selecting the user from a drop down. You can remove a user from the watchers' list by clicking the Remove icon. The vulnerability watchers will get notified of any change in the status of the specific vulnerability. For more information, click here. | |
| The Ignore functionality is used to remove a vulnerability that does not need to be addressed. For example, if a server is being taken out of service, a user may choose to ignore the vulnerabilities associated with that server, to optimize the data being displayed. Clicking this icon causes the vulnerability to be ignored. Once a vulnerability is ignored, the Ignore functionality is no longer available for that vulnerability. If a user decides to “undo” a previously ignored vulnerability, the Unignore functionality can be utilized. It is only available for vulnerabilities in Ignored status. To learn more about the Ignore/Unignore functionalities, click here. |