Vulnerabilities
Vulnerabilities refer to the flaws or weaknesses in your environment that can be exploited. Security Program 360 (SP360) detects these flaws, prioritizes them, and then suggests remedies for these exposures.
The Vulnerabilities page provides an organized and unified view of all vulnerabilities across your environment.
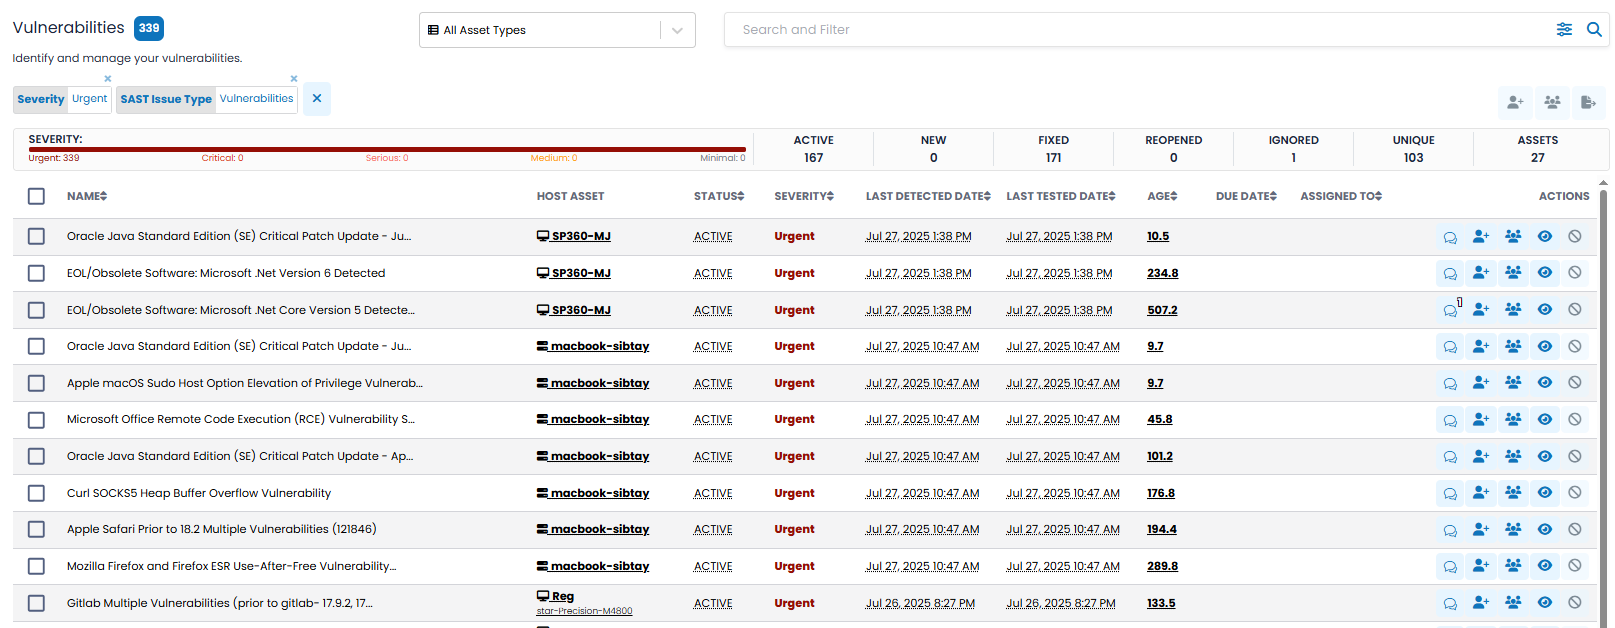
The upper left corner of the Vulnerabilities page contains a blue box with the number of vulnerabilities meeting your selection criteria, as shown below.
Filtering and Searching Options, and Action Icons
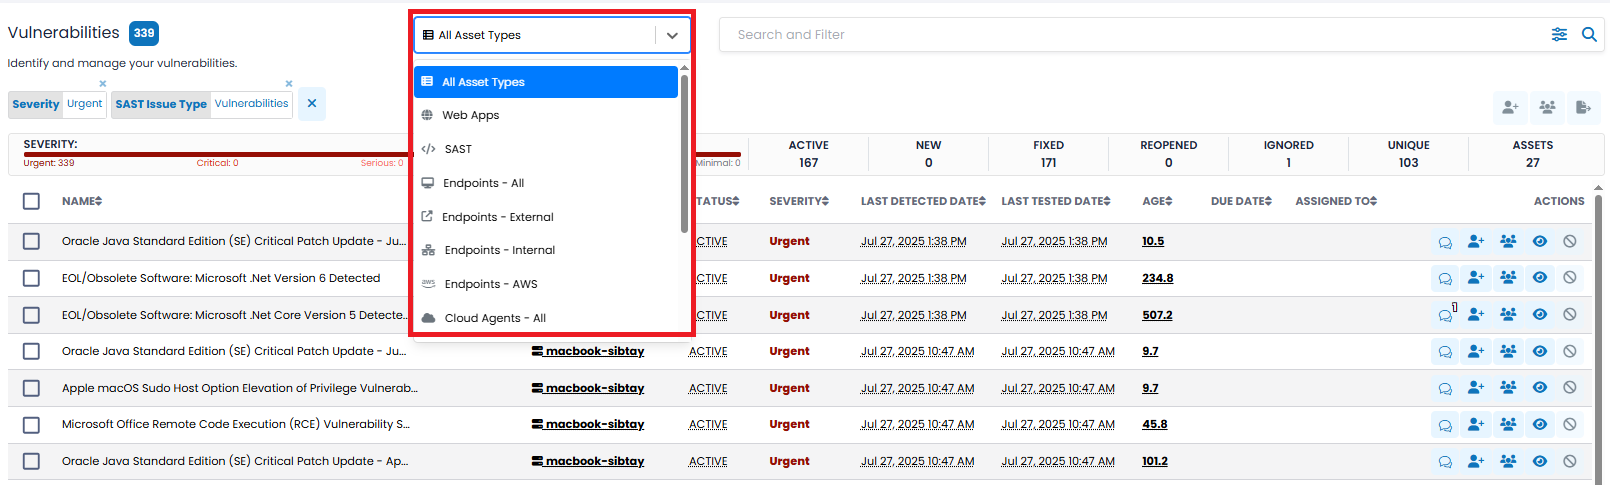
A dropdown filter at the top of the page allows you to select sets of vulnerabilities based on their asset type (i.e., Web Apps, SAST, Endpoints, and Cloud Agents). The Asset Type filter allows you to select all vulnerabilities or restrict them to only those associated with a selected asset type.
Note: If either Endpoint or Cloud Agent is selected, further filtering is available. Endpoints can be further partitioned to External, Internal or AWS, and Cloud Agents to Servers and Workstations. For example, you can select all Endpoints or just a specific subset of them.
A Search and Filter bar on the far right of the Asset Type filter allows you to select vulnerabilities based on the different attributes defined below. The Search and Filter bar presents a pull-down list of additional filtering options with many containing multi-select capabilities.
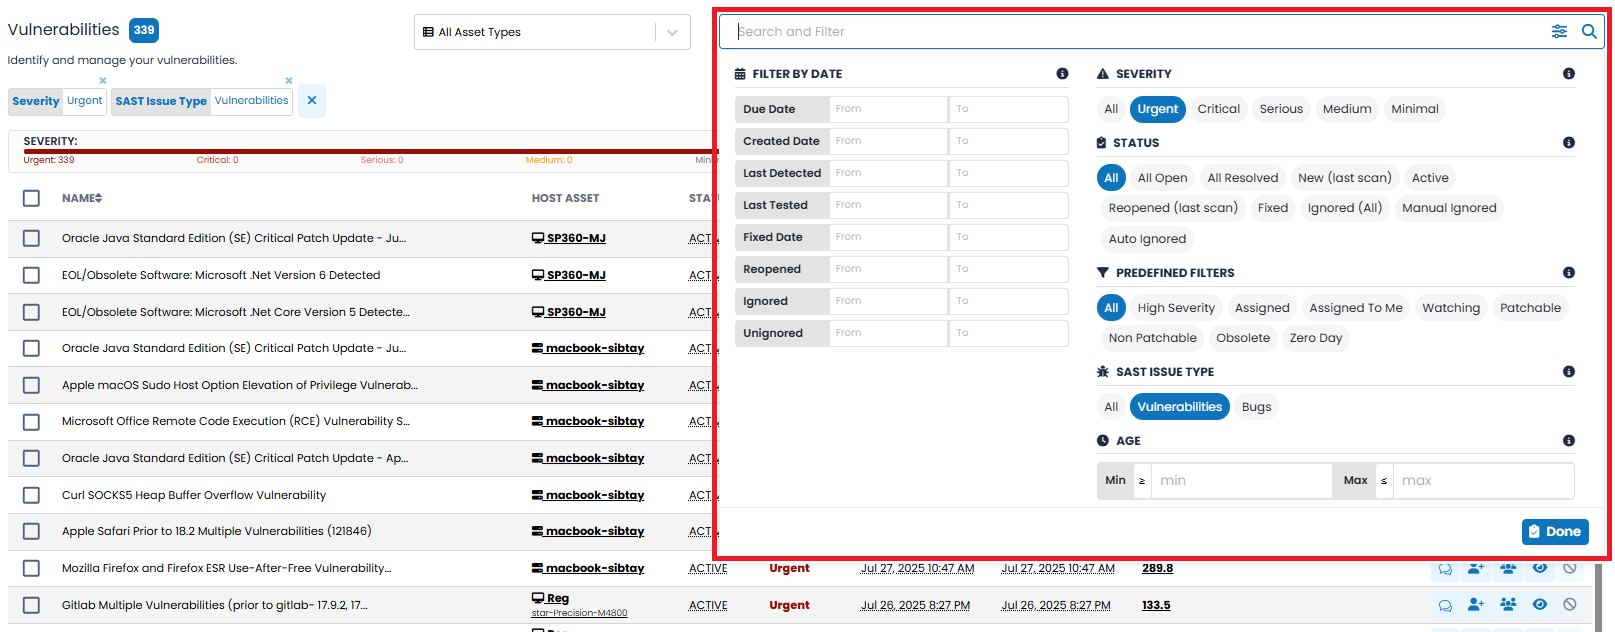
Filtering Options
| Filter Type | Description | ||||||||||
|---|---|---|---|---|---|---|---|---|---|---|---|
| SEVERITY | 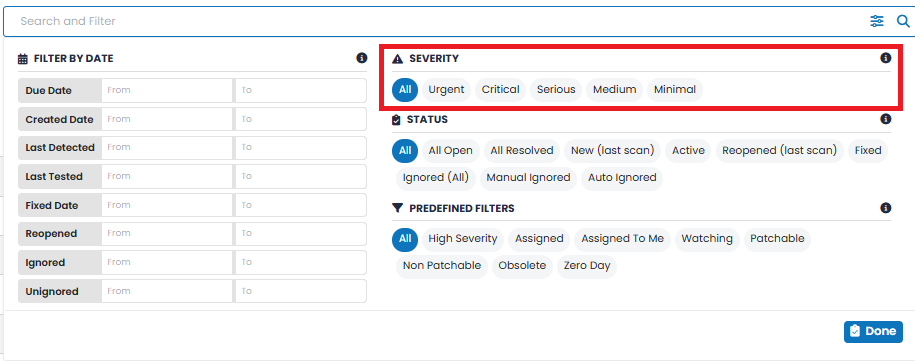
The SEVERITY of a vulnerability reflects its impact. Several severities can be selected and all those selected will be reflected in the vulnerability count and displayed in the screen. Available severities are:
STATUS | 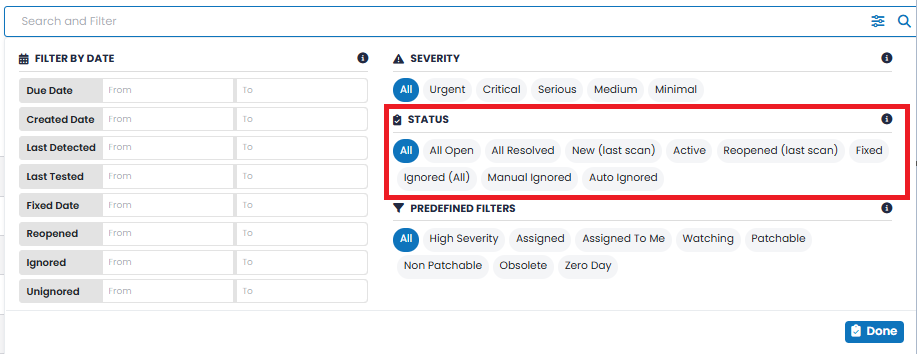
The STATUS of the vulnerabilities. Multiple statuses can be selected, and the count of vulnerabilities displayed and the grid will reflect your selection. However, some options are mutually exclusive, so selecting one will automatically unselect others. The available options are: The Status filter has a multi-select capability, where you can select multiple statuses and can see the count of vulnerabilities meeting your selected criteria. However, some options are mutually exclusive, so selecting one will automatically unselect others. PREDEFINED FILTERS | 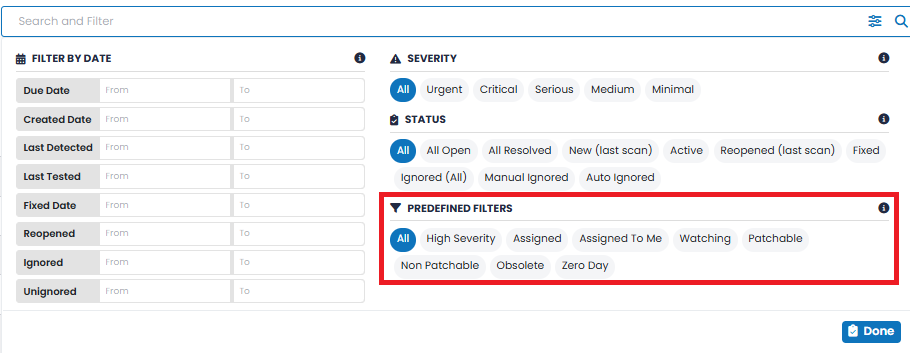
For ease of use, the PREDEFINED FILTERS option allows you to display the vulnerabilities that match a set of predefined values. Selections include: All, High Severity (i.e., Urgent and Critical), Assigned, Assigned to Me, Watching, Patchable, Non-Patchable, Obsolete, and Zero Day. These Predefined Filters cannot be changed. ISSUE TYPE | 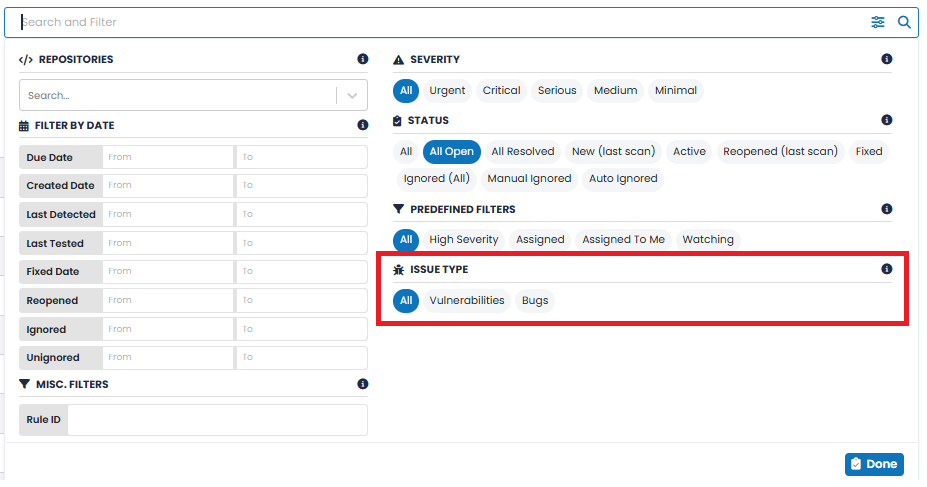
This ISSUE TYPE filtering option is applicable for SAST asset type only. The Issue Type filter allow users to display vulnerabilities that meet the specified criterion. Available options are: All, Vulnerabilities, and Bugs. FILTER BY DATE | 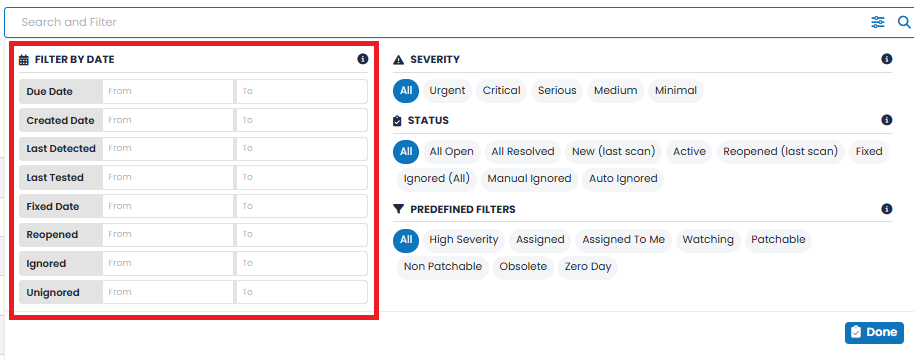
Vulnerabilities can be filtered by date. In all cases, if a From date is not specified it is assumed to be from the time the vulnerability was first identified using SP360. Similarly, if the To date is not specified, it assumes the current time: For each date attribute, clicking on the field displays a date control. On that date control, in addition to the date being specified, there is an additional field in which a time (i.e., hour, minute, seconds) can be specified within the date. MISC. FILTERS | 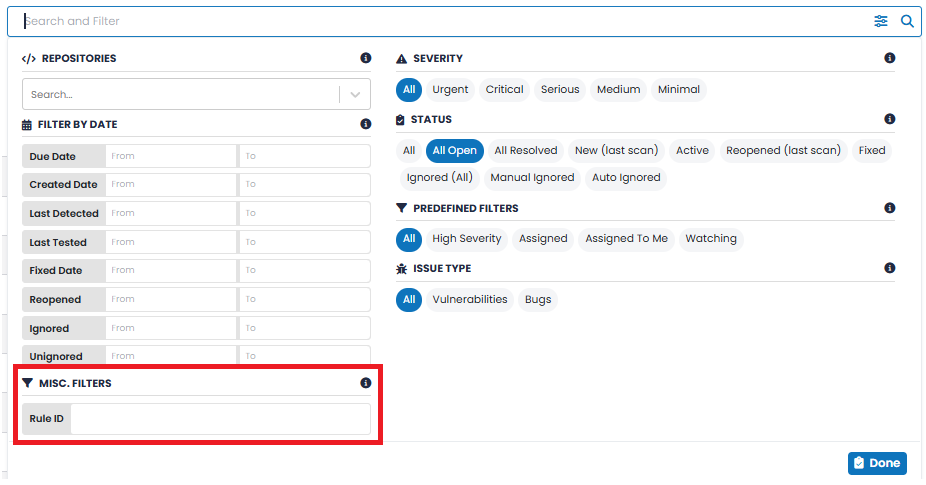
Vulnerabilities can be filtered by QID (Qualys ID) for Endpoints, Cloud Agents, and Web Apps, and by Rule ID for SAST. This additional filtering option is visible only if the Asset Type filter is selected for one of the asset types (i.e., Web Apps, Cloud Agents, Endpoints, or SAST). This filtering option is not accessible if the Asset Type filter is selected as “All”. |
Action Icons (Bulk Operations)
The checkboxes on the left allow users to select one or more vulnerabilities and apply bulk operations, for example, assign the selected set to the same person.The “Selected” control shows the number of vulnerabilities selected and that will be impacted by any bulk operation.
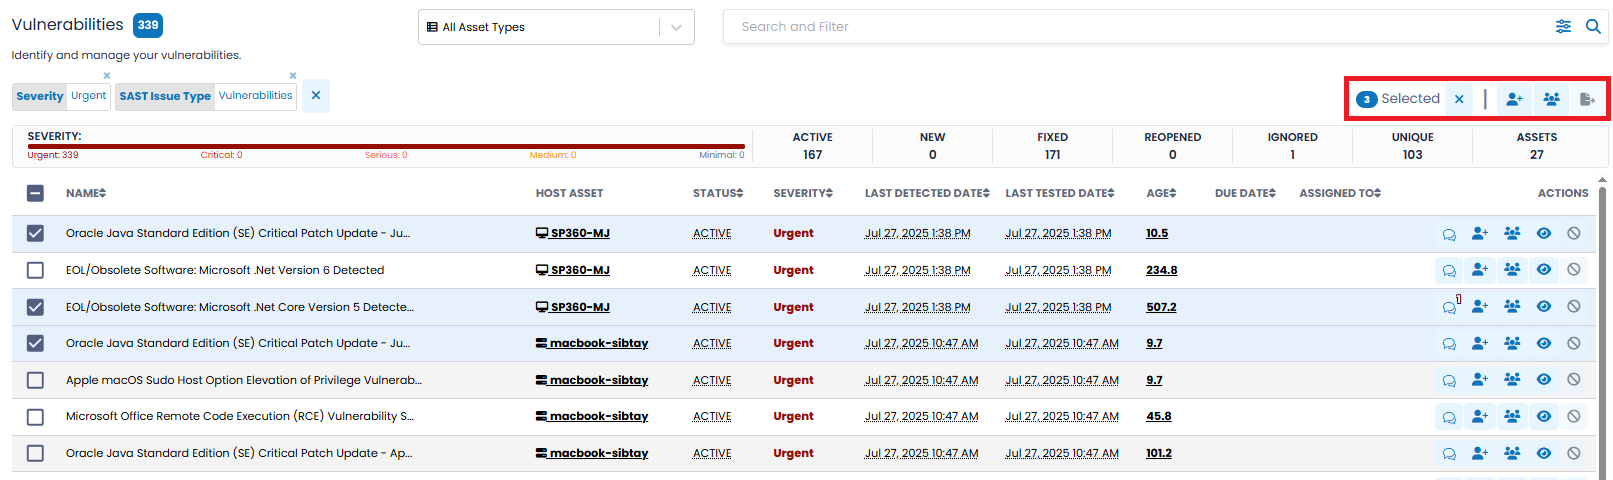
There are three bulk actions  available:
| Action Icons | Attribute |
|---|---|
 | Click this action icon to bulk assign/unassign vulnerabilities. A pop-up screen will appear, as shown below. 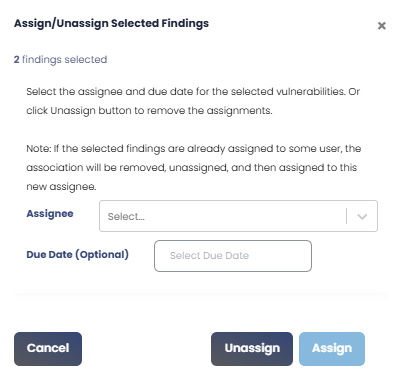 |
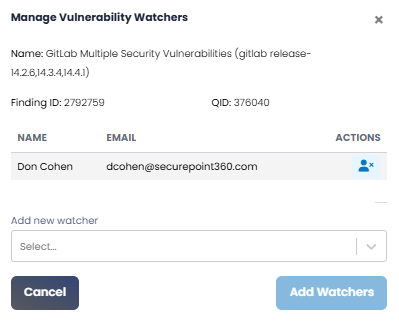
 | To bulk add/remove watchers to selected vulnerabilities. Clicking on this action icon displays the pop-up screen shown below. 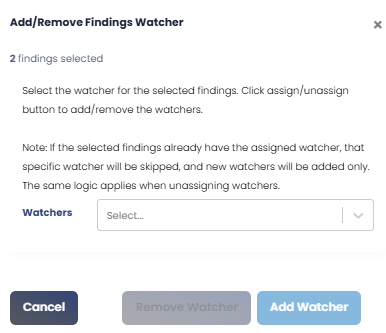 |
 | To export vulnerabilities only available for specific asset types i.e., Web Apps, Cloud Agents, SAST, and Endpoints. |
Vulnerabilities Insights Bar
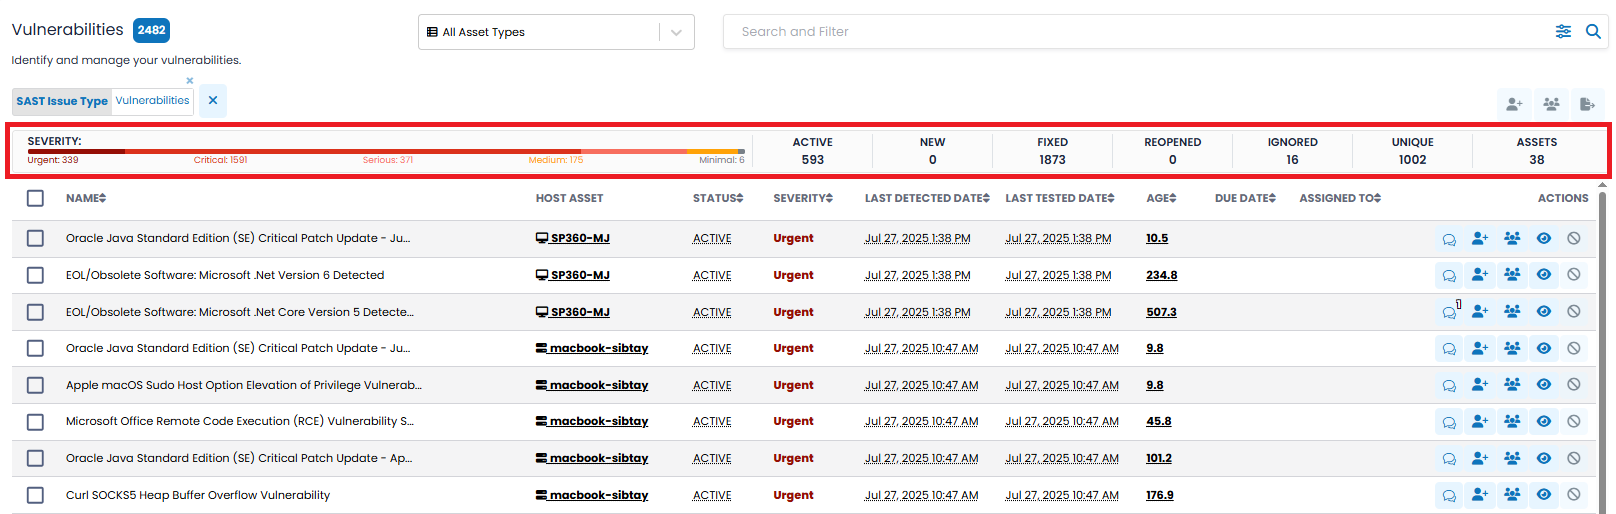
The Vulnerabilities Insights Bar provides a dynamic snapshot of your vulnerability data based on current filter selections. It visually summarizes the severity breakdown and key vulnerability states to help you quickly assess overall risk exposure and remediation progress.
This includes a visual indicator (Severity Bar) followed by several numerical summary tiles, all explained below.
-
SEVERITY Bar: This segmented bar categorizes the number of vulnerabilities by severity level:
- Urgent – Critical vulnerabilities requiring immediate remediation.
- Critical – High-risk vulnerabilities with serious security implications.
- Serious – Medium-level risks that should be scheduled for remediation.
- Medium – Low-risk issues that may still affect posture.
- Minimal – Informational or negligible-risk findings.
Each segment is color-coded and labelled with the corresponding count of vulnerabilities, enabling users to quickly triage and prioritize based on risk level.
-
Summary Tiles: To the right of the Severity Bar are key numeric indicators that provide contextual scope:
- ACTIVE – Total number of Vulnerabilities currently open.
- NEW – Vulnerabilities first detected during the latest scan.
- FIXED – Number of vulnerabilities that have been remediated.
- REOPENED – Previously fixed vulnerabilities that have reappeared.
- IGNORED – Vulnerabilities manually or automatically marked as ignored.
- UNIQUE – Count of distinct vulnerabilities (by Qualys ID).
- ASSETS – Total number of affected host assets in the result set.
These summary counts update dynamically as filters are applied, providing a real-time overview of the vulnerability landscape tailored to the user's focus area.
Vulnerabilities Grid
The Vulnerabilities grid includes the following fields by default, however, users can customize the grid to add, remove, or re-arrange fields to meet their needs by clicking the  action icon at the bottom right, explained here.
Note:
- Users can click the Host Asset value in each row to directly access the asset details page (e.g., Cloud Agent Details, Endpoint Details, Web App Details, or Repository Details) depending on the asset type.
- When a specific asset type (e.g., Endpoints - All) is selected using the Asset Type filter, the Host Asset column header will reflect the selected asset type name (e.g., Endpoint) instead of Host Asset.
- The column sets are contextual and may differ slightly for each Asset type. The explanation below is when the Asset Type filter is selected to “All Asset Types”.
| Column Headers | Definition |
|---|---|
| NAME | A brief description of the vulnerability discovered for this asset. |
| HOST ASSET | If the user selects all asset types, this column header is shown as “Host Asset”. If the user selects a specific asset type then this same column as a more specific column header, such as 'Web Application' or 'Endpoint'. Regardless, the column shows an icon for the type of asset and then the asset identifier (e.g., an IP address for an endpoint). Users can also click the individual Hosts Asset entries listed in this column to open its corresponding Details page. |
| STATUS | The status of each vulnerability i.e. New, Active, Fixed, Reopened, or Ignored.
Note: For ignored vulnerabilities, users can also learn about its previous state, at the time it was ignored. The information is shown as follows:  |
| SEVERITY | The severity of the vulnerability reflecting its impact. Available severities are: Urgent, Critical, Serious, Medium, or Minimal. |
| LAST DETECTED DATE | The date and time of the scan in which the vulnerability was last detected. |
| LAST TESTED DATE | The date and time a scan was last run. If the Last Tested Date is more recent than the Last Detected Date, then either the vulnerability was remediated, or the asset cannot be accessed. |
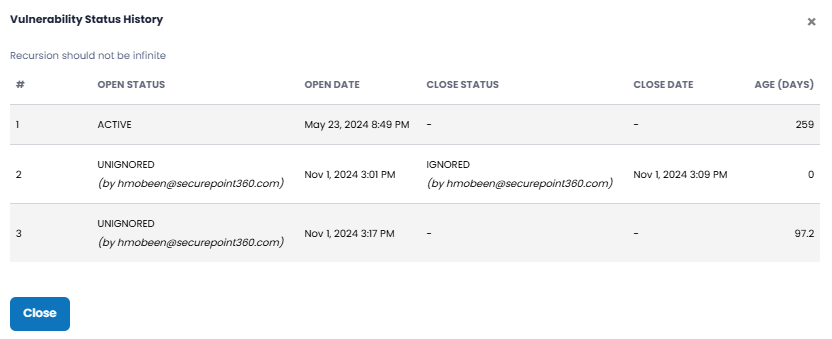
| AGE | Length of time a vulnerability has existed, in fractional days.
Note: If a vulnerability has been reopened one or more times, there will be a superscript next to the field indicating how many time that has occurred, as shown below.

Each Age field is clickable, and doing so displays a pop-up that shows the vulnerability life cycle.
 |
| DUE DATE | A date you can specify by which the vulnerability should be resolved. If the date is within a week, it is shown as amber. When the date is within three days, it is shown in red. When the date passes, so it is overdue, it is shown in a darker red. |
| ASSIGNED TO | If the vulnerability has been assigned to a team member to resolve, this field shows the name of that team member. |
To learn more about the optional fields that can be added, removed, or re-arranged in the Vulnerabilities grid, click here.
Each Vulnerability has five row-level action icons on the right side of each line.
| Icon | Description |
|---|---|
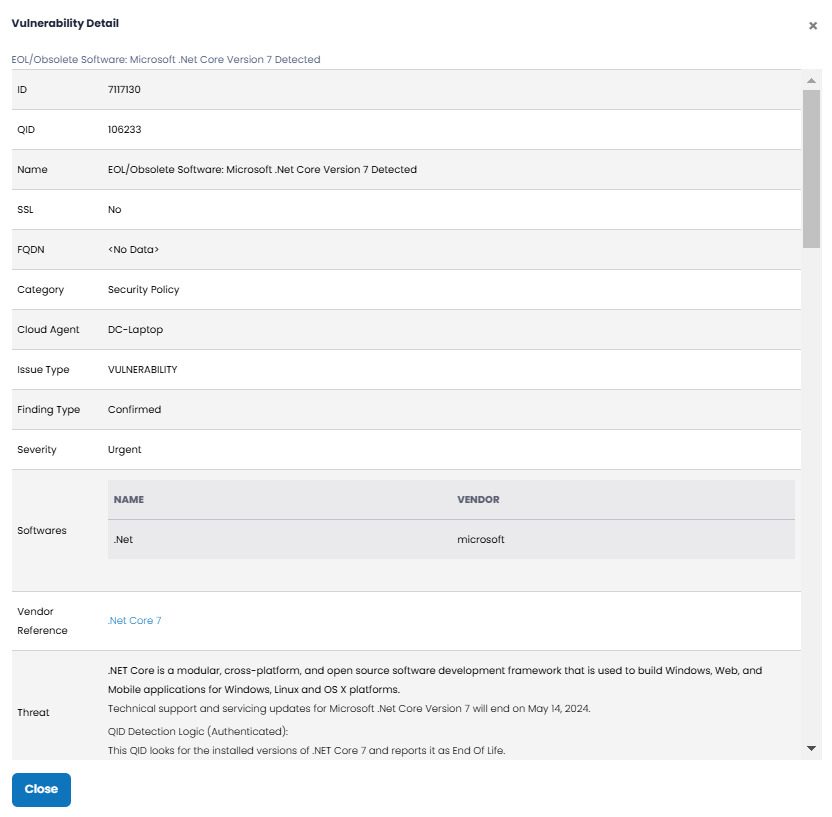
 View Details | Clicking on this icon displays a pop-up window with additional details related to the vulnerability as shown below. Information such as the location of the vulnerability and a potential remediation. This Details page is the most critical information for understanding and resolving vulnerabilities.
|
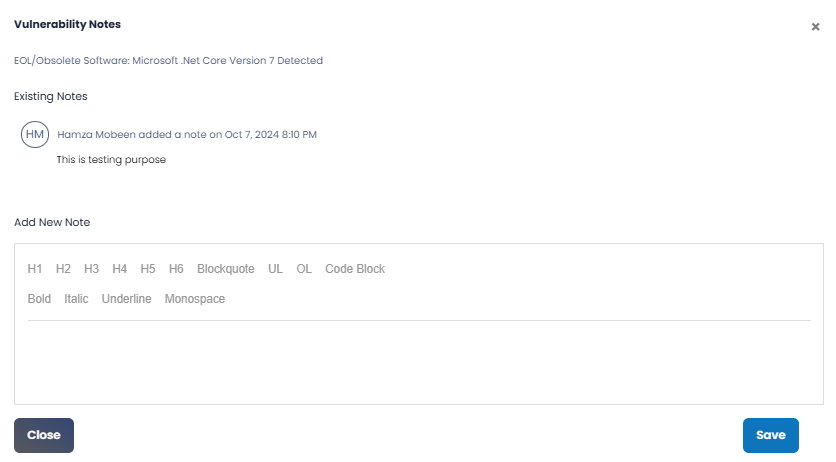
Add Notes | Clicking on this icon displays a pop-up window in which you can add, review, edit, or delete descriptive notes related to a vulnerability’s status.
Note: Only the user who added a note can edit or delete it. If descriptive notes have been added for a vulnerability, a superscript next to the icon will indicate the number of notes, as shown below.  |
Assign/Unassign | Clicking on this icon allows you to assign or unassign individual vulnerabilities directly from the grid using the row-level Assign/Unassign icon. This allows quicker task routing without needing to select and apply bulk actions. |
Add Watchers | Clicking on this icon allows you to select and add multiple users (one-by-one) as watchers for a given vulnerability. You can add a watcher by selecting the user from a drop down. You can remove a user from the watchers' list by clicking the Remove
|
Ignore/Unignore | This is the manual ignore function. The Ignore functionality is used to resolve a vulnerability that does not need to be addressed. For example, if a server is being taken out of service, a user may choose to ignore the vulnerabilities associated with that server, to minimize the data being displayed. Clicking this icon causes the vulnerability to be ignored. Once a vulnerability is ignored, the Ignore functionality is no longer available for that vulnerability. At the time a vulnerability is being ignored the user has some additional options available:
If a user decides to undo a previously ignored vulnerability, they can use the Unignore function, which is only available for vulnerabilities with an 'Ignored' status. Note: Vulnerabilities in Fixed status cannot be ignored. |
 icon. The vulnerability watchers will get notified of any change in the status of the specific vulnerability, or notes are added, or the vulnerability assignment changes.